4 December 2017

Christmas is the time for enjoyment with good friends and family. After all the feasting, drinking and merriment things often turn to snoozing or entertainmentIn addition to the brand new board games WE always enjoyed home made magic tricks, brain teasers, puzzles and quizzes. And harking back to those golden days here's a FREE set of magic cards and a trick that will astound your friends and flummox your family.
It will appear to give you terrific powers of telepathy and the most amazing mind reading.
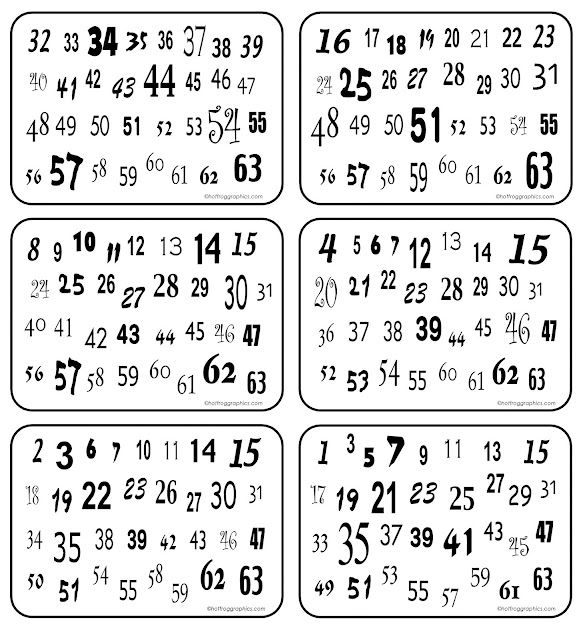
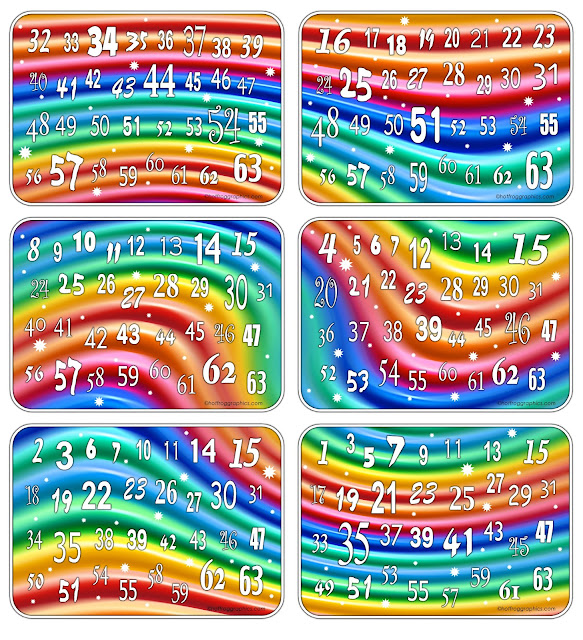
Print out the 6 cards I've prepared below (choice of colour or plain b/w) and then follow the simple instructions at the bottom of this post.
Have them to hand for after dinners over the holiday period. Book mark my blog and watch out for more amazing FREE magic coming soon.

Artwork for free set of magic cards full colour


Artwork for free set of magic cards black and white
The b/w version is great if you prefer to colour in the cards with your own designs. If you don't have a printer you can also buy a set pre-printed, directly from my Zazzle shop GET IT HERE 

Here's how to present the mind reading trick.
Ask someone to think of a number between 1 and 63, and to keep that number secret. Tell them to concentrate hard on their number as you hand them the 6 magic number cards.
Ask them to keep any card that bears their number and give the others back to you. Within seconds you tell them their secret number.

Here's how the mind reading trick works.
There is a KEY number situated in the top left corner of each card.
The KEY numbers are 1- 2 - 4 -  8 - 16 - 32. When all added together they total 63.
On the cards that bear the SECRET number, these KEY numbers ALWAYS add up to that SECRET number.
For example, if 27 is chosen, it appears on 4 cards .... 16 - 8 - 2 and 1 (top left KEY numbers). Adding those 4 KEY numbers together = 27.
So when the chosen person hands back all the cards that DO NOT bear their SECRET number, it's easy to casually add up the KEY numbers, and then DEDUCT from 63 and that is their SECRET number.
An even more impressive presentation is to make sure you give them the 6 cards in sequence - say 32 - 16 - 8 - 4 - 2 - 1 face down. Ask them to pick each card up in turn, look to see if it bears their SECRET number. Put it on a pile for YES or NO. As they place the cards back down in sequence you will be able to memorise each card that goes onto the YES pile and add up the KEY numbers as they do so.
Then immediately, and without having seen the cards or even handled them, you can reveal their SECRET number! 

Have fun and watch out for more fun tricks and puzzles on this Hot Frog Resources Blog.


3 November 2017

21 EXTRA Photoshop brush tips!
picture of monkey demonstrates fur painting techniques
In this 2nd part of my tutorial on understanding and using Photoshop Brushes you'll learn how to create MONKEY FUR, of all things, and a great deal more!
The first part can be viewed HERE .........

Having explored the fundamentals of PS brushes in part one I’m now going to show you how to create your very own unique brushes. 

The first point to remember is that any mark made on the screen can be turned into a Photoshop brush. Even a photograph can be captured and ‘stamped’ into your artwork.
You can type text, convert it to paths and then use that text image as a brush.

TIP - This can be handy when used to ‘stamp’ your copyright details, contact details etc onto an image to save time actually typing out the words.

So, to save a mark as a new brush shape always follow these steps.

Picture 1 - Rather than draw my new shape, I’ve used the path tool to create a shape called ‘single hair’. Once it’s made active and filled with black you can then save as a brush... (pic 2)

Menu / Edit / Define Brush preset ...
name your brush, I’ve called mine ‘fuzzy’ (pic 3)

screen grab showing how to create Photoshop brushes
You’ll now see ‘fuzzy’ listed as the final brush preset in the drop down list, (pic 4) and like we learnt in part 1, it isn’t of much use until you start tweaking the settings.

First of all open up the spacing (pic 5) so that when you ‘paint’ the single hair shapes are nicely spaced (pic 6).

screen grab showing how to create Photoshop brushes

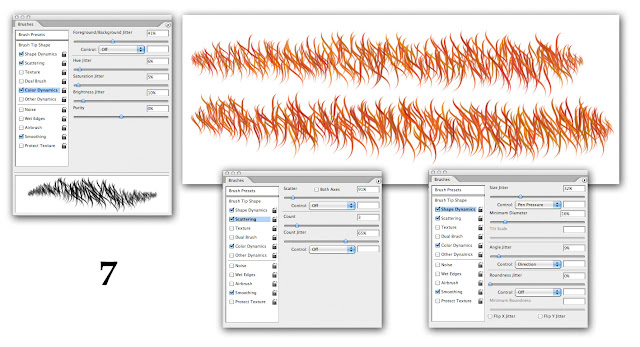
Then using these settings to multiply the single hair shape (pic 7) you will begin to see just how versatile your brush is becoming.
With a rusty red foreground colour and brighter orange as the background colour, we start to get some interesting marks.


screen grab showing how to create Photoshop brushes


We can further exploit the settings by usefully controlling the direction of the fur strokes, (pic 8) and thus, we can paint a pom-pom shape.
screen grab showing how to create Photoshop brushes

screen grab showing how to create Photoshop brushes

TIP - Another amazingly useful function I’ve not yet mentioned, is that any brush can be used to stroke along a path. So if you need a particular shape, but don’t feel confident drawing freehand, create a path, and then ask PS to stroke it with your new brush. It could be a single line (pic 10) or an elegant shape that would be impossible to control by hand (pic 11).

screen grab showing how to create Photoshop brushes

screen grab showing how to create Photoshop brushes

But of course you don’t need to restrict yourself to the initial single hair, especially if you’re after realistic fur.
Pic 12 shows a brush created from a collection of random shapes and the resulting effects achieved.

screen grab showing how to create Photoshop brushes

Your brush shapes can be saved, exported, emailed to a friend etc.
TIP - There are thousands of useful free brushes online, made available by the community of generous PS users.

I’ll briefly show you one final “Hair and Fur” brush.
I downloaded this and tweaked it, and you should still be able to find it online. Although you’d never guess from it’s peculiar single-dab brush shape (it’s that white squiggle on the blue square) this is one of the most realistic brushes around for painting hair, and many artists have used it to great effect.

Take a look at my settings (pic 13) and then how I gave myself a quick 10 minute hairy makeover in pic 14.

screen grab showing how to create Photoshop brushes

screen grab showing how to create Photoshop brushes


2 November 2017


TIP - Rather than resort to expensive and difficult to master 3D programmes, I’ve instead been using various hair and fur brushes for a number of years now.
Here you can inspect a few of my characters that have benefitted from these particular brushes ...

screen grab of image showing photoshop brush fur technique

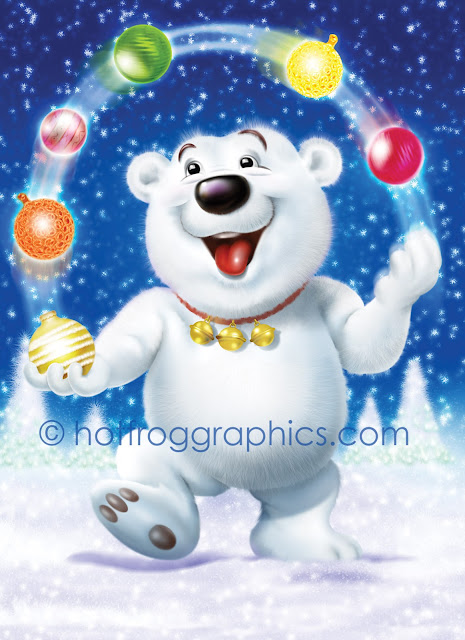
In this fun Polar Bear Christmas card design 
the fur, the frosty trees, snow and the snowflakes all use custom Photoshop brushes.

screen grab of image showing photoshop brush fur technique


Fellow illustrator Mike Brownlow includes various PS brushes amongst his array of illustration tools and techniques. He says,
“Brushes can be great when used judiciously, and are really useful. I just wish I could work out a better way of organising them.”

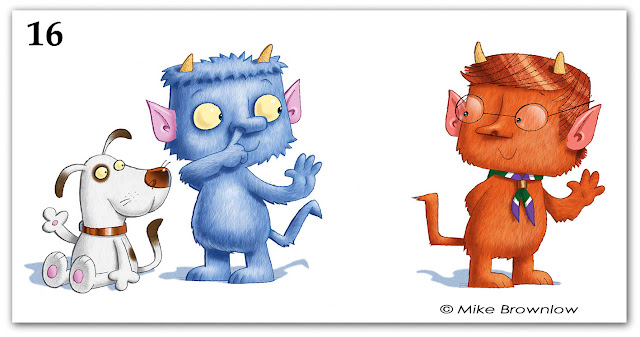
Here’s how Mike employs his subtle craft, carefully using fur brushes, and others, in his successful Boris the Troll books...

image of picture book characters by Mike Brownlow


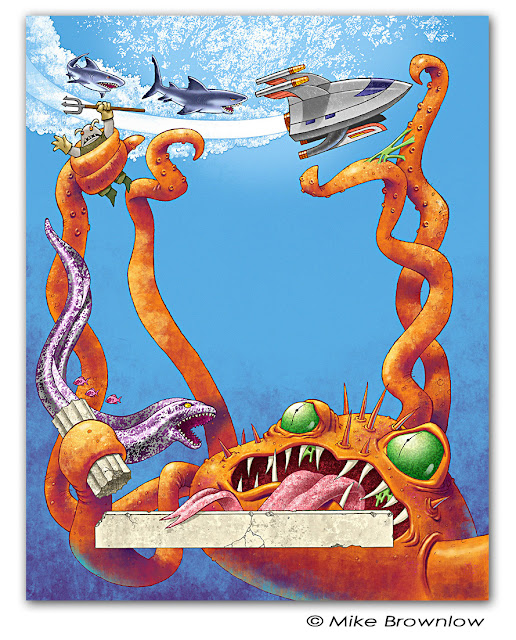
And here with some underwater and skin textures from his book Kraken Attack ...
picture book illustration by Mike Brownlow

FOLIAGE BRUSHES.
Obviously all the considerations and the various settings that I’ve mentioned so far in connection with fur and hair, can equally be applied to any other texture or effect that you’re after.

Without going into extra details here’s a collection of my own foliage brushes, (pic 17) the actual brush shapes are shown at the top along with the resulting effects.


screen grab from the tutorial by Hot Frog Graphics on Photoshop brushes


And in this jungly/forest book illustration, (pic 18) you’ll see how I’ve made good use of a few of them.


screen grab from the tutorial by Hot Frog Graphics on Photoshop brushes


Finally, let me show you how to create a really cool textured pastel/chalk brush.
(pic 20) In the vignetted oval we can see the actual brush shape, and below, the settings used to achieve these soft pastel-like marks.

TIP - The background is a scan of pencil on cartridge and the texture used in the brush settings aims to emulate this so that the colour sits on top of the cartridge, unless more pressure is used, and then the colour sinks into the texture.


screen grab from the tutorial by Hot Frog Graphics on Photoshop brushes

And below, these soft, watercolour-like marks in pic 21 were made with the 3 brush tip shapes pictured at the top. 

TIP - Your original brush shape needn’t be filled with 100% black, remarkable effects can result from faded softer brush shapes.

One final thought, having created a favourite brush, don’t limit yourself to ‘painting and drawing’ with it.
You can deploy your brand new brush as an eraser or even as the smudge tool for some further exciting and unexpected effects.

screen grab from the tutorial by Hot Frog Graphics on Photoshop brushes


Have fun with your brush experimenting and be sure to bookmark this blog and check back for more pro Photoshop tips in future.


You can see more of my Photoshop illustration work at www.hotfroggraphics.com
and even contemplate buying a whole range of gifts featuring my designs on my HOT FROG ZAZZLE SHOP. 


30 September 2017

Welcome to my brand new blog! 
To coincide with the opening of my brand new Zazzle shop, I’ve created this shiny new blog resource. On here I will share some of my design experience and illustration expertise - the top tips, the fun facts and strewn throughout with loads of useful extras.
Follow this blog and you’ll discover invaluable Photoshop tips and techniques for this wonderful piece of software.

Felix the first Aid frog character illustration by Hot Frog GraphicsThere will also be FROGS. Yes and lots of them! Artwork and illustration plus links to websites, stories, free activity sheets and more. As a designer and illustrator I receive commissions of all kinds from all over the globe, from custom wedding stationery to character creation; from children’s games to high street posters.

I’ve put together some easy to follow advice that will hopefully benefit budding creatives and will also be an interesting read for everyone. So please bookmark this blog and drop by from time to time to see what's new.
GET STARTED RIGHT NOW BY CHECKING OUT BELOW! 
Here are some fun goodies from my Monster Mixer range of spooky creatures.
I've just launched a range of Halloween cards, trick-or-treat bags and more over on my Zazzle shop. To accompany those you can also download your very own Grumblesnout mask to scare up your neighbours when you're out trick-or-treating. And if you're having a party you might like to print out this fun to colour in Monster Mixer picture.

Free "Grumblesnout" download mask to cut out and wear


Free b/w Monsters picture to print off and colour in

To view the full range of Monsters on offer please pop next door to my HOT FROG ONLINE ART STORE or fly on a fast broom straight over to my ZAZZLE SHOP. Have fun!!!


20 September 2017

As a designer I'm often intrigued why some people are drawn to a particular colour. In business it makes good sense to research your colour choices with care.
But what about your wedding day?
Every so often I'm commissioned to design a set of wedding stationery and by this stage the colours have nearly always been chosen and agreed upon. This gives me a little less work to do as I don't have to experiment with various colourways. 
It got me thinking about what a colour choice might say about you on this most important (and expensive) of days of your life.
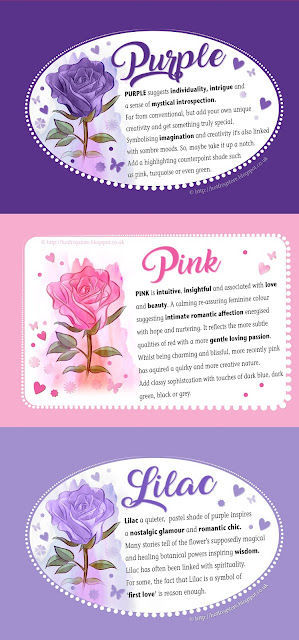
So here's the first of two posts with handy info-graphics to download and keep. You never know, it may help you make that big decision about what colour the cup cake icing needs to be.
The second half of this post with a further six colours will follow in a few weeks. Hopefully, if your choice isn't here, I won't keep you wondering too long !!!
Please click on the image to enlarge and feel free to download it. Please would you credit ©http://hotfrogstore.blogspot.co.uk/
should you re-post it, thank you.

info-graphic showing panel of 3 wedding colours, orange, gold, red


info-graphic showing panel of 3 wedding colours, purple, pink, lilac


17 July 2017

Artwork for banner I LOVE FROGS

I LOVE FROGS - regular posts about all things froggy! Please bookmark and check back for more.

We're back again with party idea no 2. Download and print this black and white drawing. Give out prizes for all those taking part. Best colouring. Best names for the frog. Best new bugs etc.


          #2. COLOURING IN FROG PICTURE          

black and white illustration of froggy catching insects


colour illustration of froggy catching insects

I've included the original full colour illustration for your inspiration. Yours doesn't have to be a moonlit scene tho. Try adding your own extra bugs for the frog to catch. Try adding some wacky patterns to the frog.

DON'T FORGET TO CHECK OUT THESE OTHER FROG PARTY IDEAS


13 July 2017

1.So let’s get started and kick off the launch of this new blog with an information packed tutorial - understanding and using Photoshop brushes.This blog post will be in 2 parts starting with these NINE top tips .........


title banner for 9 free Photoshop Brush tips


Photoshop is one of the cornerstones of digital art, so ubiquitous, there can be few illustrators who've not experienced the software at some stage in their career. Here’s the first of two blog posts on customising brushes in Photoshop to create unique textures. Anyone who has used Photoshop will know that it boasts some great illustration tools. Its basic set of brush tools allows you to airbrush very convincingly and if you care to dig a little deeper, you'll find the natural (and unnatural) media brushes that are provided in the package. With perseverance you can learn how to customise these tools and create your very own, resulting in virtually unlimited possibilities - such as the ability to paint with grass, cloak a creature in fur, paint foliage on a tree, airbrush wisps of smoke, snakeskin, glitter, barbed wire, etc etc. 
Take a look at the illustration that heads this article. Click to enlarge. Every mark you see on there has been created using a customised brush. I'm going to show you how to achieve this and I'll also give you the settings for some of those brushes so that you can try them for yourselves. 


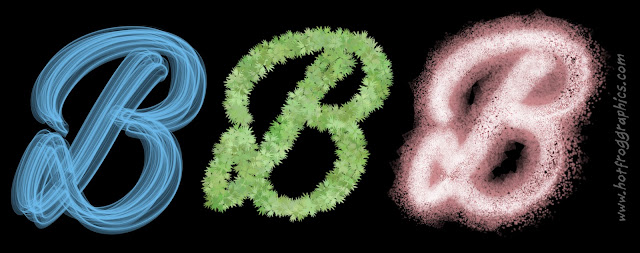
examples from 9 free Photoshop Brush tips


First let's check out the most basic of brushes and get a grasp of their functionality. There are hard edged and soft edged brushes, and a variety in between. Typically, pencils are hard edged with no anti aliasing ie. no soft edges. I find it useful to view my onscreen brush tip as 'normal size' or 'full size'. Then, as you're working, you see a ring indicating roughly the size of the tip you're dealing with. Much clearer than the standard cross-hair cursor. To do this, go to Photoshop preferences and choose 'Display and Cursors'.It's also useful at this stage to appreciate how important it is to use a graphics tablet and stylus such as Wacom, in order to master the natural look of each brushstroke. It's understandable for newcomers to be a little cautious at first, but try signing your signature on screen using a mouse. Then with a stylus. There's no contest. 


2. 9 Free Photoshop brush tips   


So with the brush tool selected, go to Window/brushes (or F5) which opens the 'Brush Palette'. Choose, for example, a fairly large, hard edged brush.


Picture 1 - shows our hard edged brush stroked firstly with a mouse then with the tapered elegance created by using a stylus. 


step 1 example Photoshop brush tips


With the 'Brush Palette' open it's here's where you can choose the size and style of brush from the drop down list. Make sure you take note of the mini palette called 'Brush Presets' as this is where all the brush alchemy takes place. 

 With 'Brush Tip Shape' selected, look at the bottom of the long palette and you'll see controls for brush spacing, brush size, softness and brush angle controls. To squidge the shape and angle of the brush (not terribly useful, but you may as well know how) use the cross hair control. 

All the changes you make get a mini dynamically updated window at the base displaying your current brush stroke. 

Picture 2 - shows how the round brush has been squidged, more obviously apparent when painting in various directions. 


step 2 example Photoshop brush tips


As you paint with any brush, Photoshop spits out a series of dots of 'paint' at regular intervals. Lots of frequently emitted dots produces a solid line of paint. But if you slow down and control the frequency of the dots, you'll get...a dotted line. 
step 2 example Photoshop brush tips

Picture 3 - painting with regular dots at regular intervals is ok for regular graphic and decorative work, but if you're striving to get 'natural,' then we need to mix it up with a few random factors. Let's make our rows of squashed dots become random sizes.

continues next page ...


3. 9 Free Photoshop brush tips   

Picture 4 - shows how 'Shape Dynamics' gives precise control over the min and max size limits of our dots, with 'Size Jitter' mixing them around between. 


step 4 example Photoshop brush tips

And rather than keep these random dots flowing in one continuous line, let's try and disturb their flow.

Picture 5 - shows how 'Scattering' allows the dots to fall either side of our continuous line and using blue and green as foreground and background colours, we can also randomise the colour of our dots by using 'Colour Dynamics'. 

step 5 example Photoshop brush tips

All we've done here is ask for blue and green to alternate as each dot is painted (jitter at 100%), but if the jitter was set at 30% for example, we'd get various tones of blue through green as we 'sprayed' with colour. Additionally if you turned on 'Hue Jitter', you'd get complementary colours thrown into the mix. At its most extreme, you could paint with rainbow coloured dots. 

The total control over this randomness, which affects the scattering, the intensity, the direction, the opacity, the purity of colours and more, can all be further influenced by the pressure sensitivity of the stylus. As you draw on the tablet, a change of pressure can alter most of these effects, as can the initial direction that you begin to paint in. It's bewildering, but now that you've got so far, you hopefully have a grasp of the fundamentals. 


But who wants to paint with dots all the time? (latter day digital pointillists maybe), because no matter how much we mix up these variations, the dots are still dots. But if you pick one of PS media brushes such as chalk, pastel, crayon, etc then it starts to look a whole lot more natural and very practical for 'real' illustration work. 

Let's choose one of the chalk and pastel brushes. At the bottom of my list of brushes I've adapted and customised one of PS pastel brushes and re-named it 'best new pastel'. 

Picture 6 - if you zoom in and inspect a single brush 'dab' (created with a single click of the mouse) instead of a dot, it looks like this…  

step 6 example Photoshop brush tips