21 EXTRA Photoshop brush tips!
In this 2nd part of my tutorial on understanding and using Photoshop Brushes you'll learn how to create MONKEY FUR, of all things, and a great deal more!
The first part can be viewed HERE .........
Having explored the fundamentals of PS brushes in part one I’m now going to show you how to create your very own unique brushes.
The first point to remember is that any mark made on the screen can be turned into a Photoshop brush. Even a photograph can be captured and ‘stamped’ into your artwork.
You can type text, convert it to paths and then use that text image as a brush.
TIP - This can be handy when used to ‘stamp’ your copyright details, contact details etc onto an image to save time actually typing out the words.
So, to save a mark as a new brush shape always follow these steps.
Picture 1 - Rather than draw my new shape, I’ve used the path tool to create a shape called ‘single hair’. Once it’s made active and filled with black you can then save as a brush... (pic 2)
Menu / Edit / Define Brush preset ...
name your brush, I’ve called mine ‘fuzzy’ (pic 3)
You’ll now see ‘fuzzy’ listed as the final brush preset in the drop down list, (pic 4) and like we learnt in part 1, it isn’t of much use until you start tweaking the settings.
First of all open up the spacing (pic 5) so that when you ‘paint’ the single hair shapes are nicely spaced (pic 6).
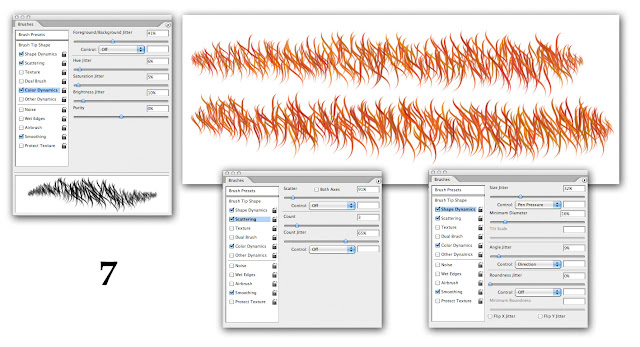
Then using these settings to multiply the single hair shape (pic 7) you will begin to see just how versatile your brush is becoming.
With a rusty red foreground colour and brighter orange as the background colour, we start to get some interesting marks.
TIP - This can be handy when used to ‘stamp’ your copyright details, contact details etc onto an image to save time actually typing out the words.
We can further exploit the settings by usefully controlling the direction of the fur strokes, (pic 8) and thus, we can paint a pom-pom shape.
TIP - Another amazingly useful function I’ve not yet mentioned, is that any brush can be used to stroke along a path. So if you need a particular shape, but don’t feel confident drawing freehand, create a path, and then ask PS to stroke it with your new brush. It could be a single line (pic 10) or an elegant shape that would be impossible to control by hand (pic 11).
But of course you don’t need to restrict yourself to the initial single hair, especially if you’re after realistic fur.
Pic 12 shows a brush created from a collection of random shapes and the resulting effects achieved.
Your brush shapes can be saved, exported, emailed to a friend etc.
TIP - There are thousands of useful free brushes online, made available by the community of generous PS users.
I’ll briefly show you one final “Hair and Fur” brush.
I downloaded this and tweaked it, and you should still be able to find it online. Although you’d never guess from it’s peculiar single-dab brush shape (it’s that white squiggle on the blue square) this is one of the most realistic brushes around for painting hair, and many artists have used it to great effect.
Take a look at my settings (pic 13) and then how I gave myself a quick 10 minute hairy makeover in pic 14.


No comments:
Post a Comment